


Enpatsu No Shakugan
Well-known member
- Joined
- Apr 2, 2018
- Messages
- 657
- Reaction score
- 9
I love to work with my hands and modify things. I modify almost everything I own to some extent, to add functionality, my style or just give it a bit more of a pop.
Not sure how many of you are familiar with the FPS game Bioshock Infinite, but it has one of the coolest weapons ever in it, the Skyhook:
Or you can use it like this:
It's so cool there was a prop model released by Neca that is a plastic replica that had a revving mechanic. It didn't spin anywhere near as fast, but as a prop, it was pretty cool.
But then I changed that:
This:
To this:
Never seen anyone else do this, so I thought I'd post. I did briefly show this before, but here's the long version.
Sorry this is not a step by step process, as when I was making it, I winged it, nor was I registered here, but I'll try and explain my methods as best as possible.
The moment I bought it, I said to myself "Man, this is cool, but I wish it actually spun like in the game", but knew it was beyond my understanding and I didn't want to risk breaking it.
Luck had it that years later, it broke. The winding mechanism inside had lost a piece, so I dared take it apart to try and fix it. Lull and behold, after much tinkering alone, I did figure out how it managed to work and could've fixed it again, but then I stopped, "Wait... this might be my chance now to actually do what I've always wanted."
I did a little research on how motors work, soldering, electronics, etc and figured I might be able to do it.
Thankfully, this would not have been possible without some custom help by a very friendly Etsy user who was selling custom fans for costumes. I didn't need it for that, but I was interested in the switch unit he had and requested a custom switch and length of wire, with a 9V battery end. He could leave out the fan.
He agreed and for 9 dollars, shipped me exactly what I needed. While I waited, I went ahead and painted the dark brown on the body itself a more accurate wood color.
In the meantime, I began gutting the hook entirely. The entire mechanism of how it worked before was removed and I cut the extending neck short to permanently attach it further down with super glue, along with carving out some grooves in the way. I did keep the ones at the very end, as it would house a 9V battery perfectly.
Turns out the wires ran perfectly up the neck and out two holes in the top, where the axle would be right beside the motor.
Because I'm a total novice with no clue how triggers actually work, I used the swiveling lever that once moved the neck as a literal switch. Pulling the trigger would swing the arm inside, flipping the switch on and off. I had to melt it a little to curve it, but it ended up working fine. I did add a tiny spring to allow you to rev the trigger for show when it's flipped on, though.
It was there where I secured everything and the switch to the mechanism:
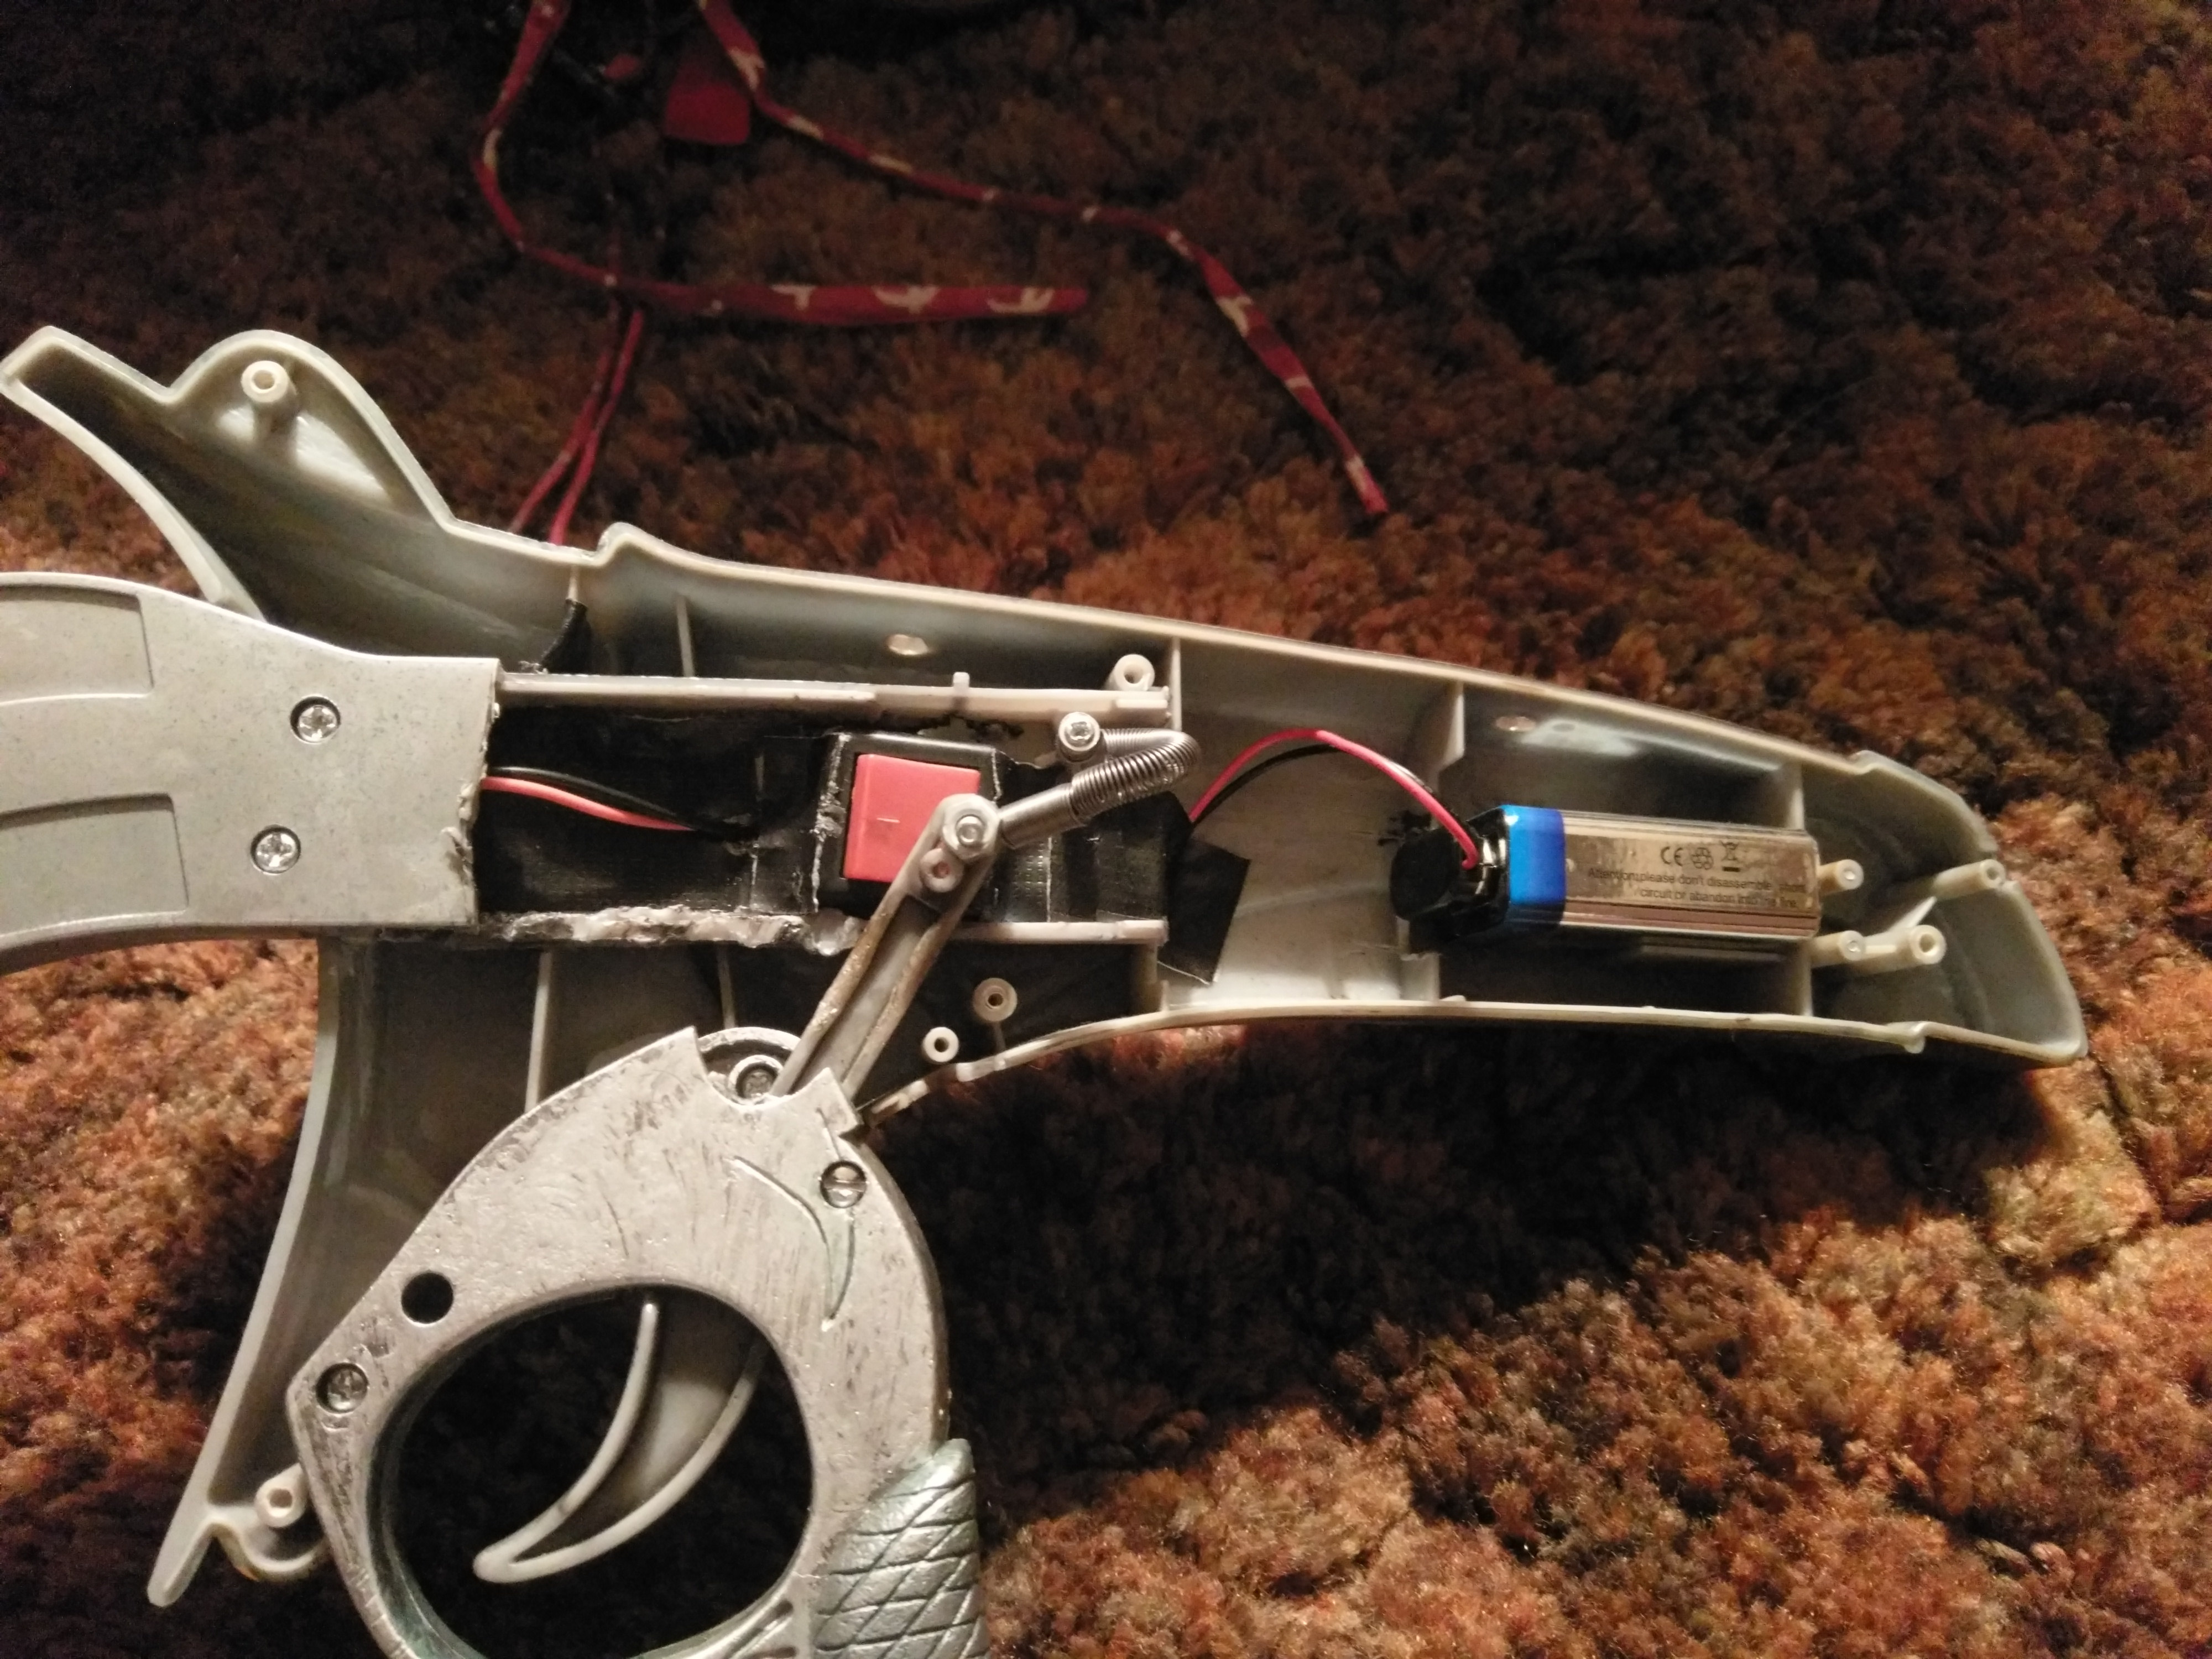
With that in and working, I sealed up the neck with the original screws and moved up to the tip.
For the hook to work as it should, you need a dual shaft motor with medium power in a compact size that will work on 9V.
http://www.ebay.com/itm/DC-12V-6300R...4AAOSwB09YFrma
This was the best model I found. Good price, good power and nice size.
Then comes the hard part. To keep both ends of the hook in place, you have to use the original axle (as they fit into them, keeping them secure). I used a dremel to cut it in half. The end for the gear on the body had a lot of added stuff on it that you will need to cut off too. Remnants of how it used to work.
From there, you will need axle couplers.
http://www.ebay.com/itm/2-3-4-5-6-7-...ZPeeu-aDN2BR8A
2mm to 5 is what I used, I believe. You can't connect them otherwise. From there, connect it, solder the ends, it should look like this:
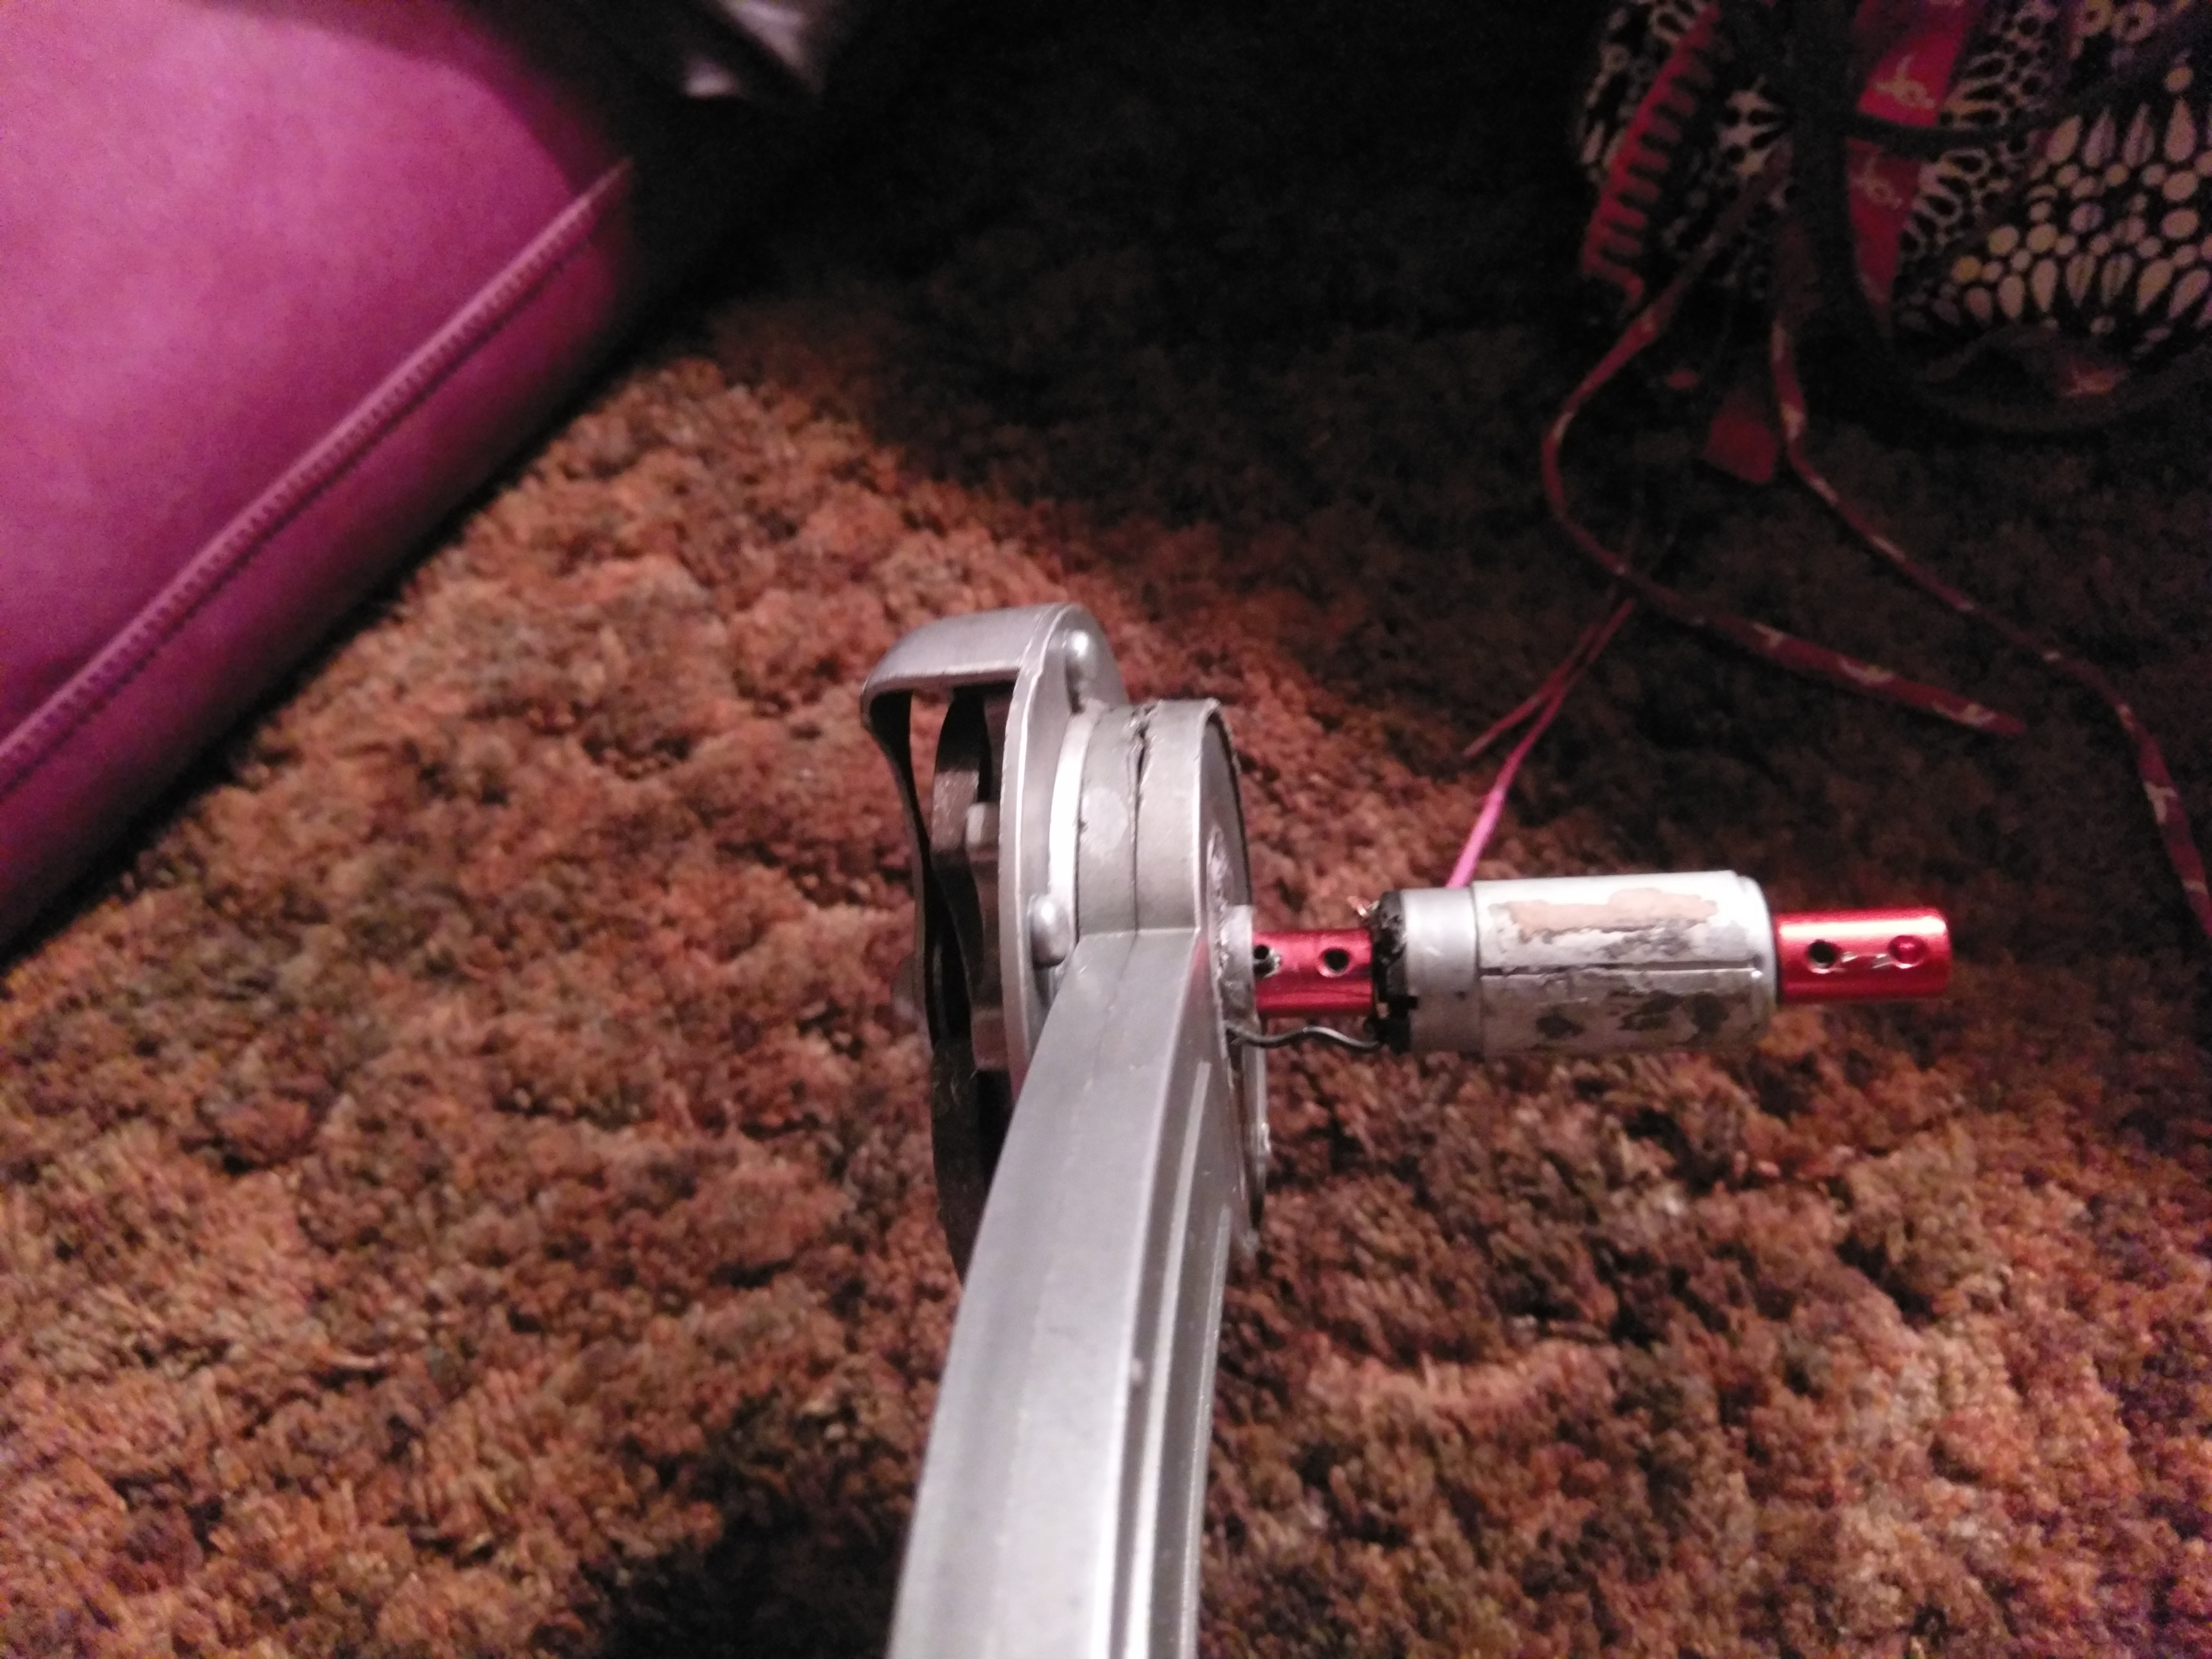
Try and get it as small as possible, but you will never get it as short as it was before, so you need to replace the original brown axle. It won't fit.
You can pick up a plastic replacement at Ace Hardware for around 2 dollars, or, if you're lucky like I was, find a piece of plastic plumbing at a yard sale with a silver finish and use that.
Make sure you attach the gear (seen in the picture) first, then place your new axle over the engine. Glue it down hard. Next, there will be empty space, so it's important you keep the motor in place. I just crammed in pieces of foam into the new axle to make sure that engine won't be spinning itself, but its axles. When all that is done, fasten the end of the hook (that will be spinning) and bam, you're done.
For power, a 9V will power this to great speed (as the videos demonstrate), but I recommend rechargeable 9Vs, since you'll burn through them before too long.
As for changing the batteries, it's a bit of a pain, but you have to take the sides off and take off all the external pieces that go there. It's minor, but it only takes about 5 minutes. Small price to pay, and you won't be doing it too often.
I tried to find a mini power supply I could use instead and have the recharge ports sticking out, but I couldn't find one with the plug in to attach and the recharge port on opposite sides. They're all the same side, which will not work in this compact space, so this is the best I can do.
Overall, this cost, not including the 100+ purchase of the Skyhook or the dremel I used, itself roughly 25-30 bucks, along with labor.
If a novice like me can wing it and make it work, I think literally anyone else could do something cooler than this.
Just something I wanted to share.
Not sure how many of you are familiar with the FPS game Bioshock Infinite, but it has one of the coolest weapons ever in it, the Skyhook:
Or you can use it like this:
It's so cool there was a prop model released by Neca that is a plastic replica that had a revving mechanic. It didn't spin anywhere near as fast, but as a prop, it was pretty cool.
But then I changed that:
This:
To this:
Never seen anyone else do this, so I thought I'd post. I did briefly show this before, but here's the long version.
Sorry this is not a step by step process, as when I was making it, I winged it, nor was I registered here, but I'll try and explain my methods as best as possible.
The moment I bought it, I said to myself "Man, this is cool, but I wish it actually spun like in the game", but knew it was beyond my understanding and I didn't want to risk breaking it.
Luck had it that years later, it broke. The winding mechanism inside had lost a piece, so I dared take it apart to try and fix it. Lull and behold, after much tinkering alone, I did figure out how it managed to work and could've fixed it again, but then I stopped, "Wait... this might be my chance now to actually do what I've always wanted."
I did a little research on how motors work, soldering, electronics, etc and figured I might be able to do it.
Thankfully, this would not have been possible without some custom help by a very friendly Etsy user who was selling custom fans for costumes. I didn't need it for that, but I was interested in the switch unit he had and requested a custom switch and length of wire, with a 9V battery end. He could leave out the fan.
He agreed and for 9 dollars, shipped me exactly what I needed. While I waited, I went ahead and painted the dark brown on the body itself a more accurate wood color.
In the meantime, I began gutting the hook entirely. The entire mechanism of how it worked before was removed and I cut the extending neck short to permanently attach it further down with super glue, along with carving out some grooves in the way. I did keep the ones at the very end, as it would house a 9V battery perfectly.
Turns out the wires ran perfectly up the neck and out two holes in the top, where the axle would be right beside the motor.
Because I'm a total novice with no clue how triggers actually work, I used the swiveling lever that once moved the neck as a literal switch. Pulling the trigger would swing the arm inside, flipping the switch on and off. I had to melt it a little to curve it, but it ended up working fine. I did add a tiny spring to allow you to rev the trigger for show when it's flipped on, though.
It was there where I secured everything and the switch to the mechanism:
With that in and working, I sealed up the neck with the original screws and moved up to the tip.
For the hook to work as it should, you need a dual shaft motor with medium power in a compact size that will work on 9V.
http://www.ebay.com/itm/DC-12V-6300R...4AAOSwB09YFrma
This was the best model I found. Good price, good power and nice size.
Then comes the hard part. To keep both ends of the hook in place, you have to use the original axle (as they fit into them, keeping them secure). I used a dremel to cut it in half. The end for the gear on the body had a lot of added stuff on it that you will need to cut off too. Remnants of how it used to work.
From there, you will need axle couplers.
http://www.ebay.com/itm/2-3-4-5-6-7-...ZPeeu-aDN2BR8A
2mm to 5 is what I used, I believe. You can't connect them otherwise. From there, connect it, solder the ends, it should look like this:
Try and get it as small as possible, but you will never get it as short as it was before, so you need to replace the original brown axle. It won't fit.
You can pick up a plastic replacement at Ace Hardware for around 2 dollars, or, if you're lucky like I was, find a piece of plastic plumbing at a yard sale with a silver finish and use that.
Make sure you attach the gear (seen in the picture) first, then place your new axle over the engine. Glue it down hard. Next, there will be empty space, so it's important you keep the motor in place. I just crammed in pieces of foam into the new axle to make sure that engine won't be spinning itself, but its axles. When all that is done, fasten the end of the hook (that will be spinning) and bam, you're done.
For power, a 9V will power this to great speed (as the videos demonstrate), but I recommend rechargeable 9Vs, since you'll burn through them before too long.
As for changing the batteries, it's a bit of a pain, but you have to take the sides off and take off all the external pieces that go there. It's minor, but it only takes about 5 minutes. Small price to pay, and you won't be doing it too often.
I tried to find a mini power supply I could use instead and have the recharge ports sticking out, but I couldn't find one with the plug in to attach and the recharge port on opposite sides. They're all the same side, which will not work in this compact space, so this is the best I can do.
Overall, this cost, not including the 100+ purchase of the Skyhook or the dremel I used, itself roughly 25-30 bucks, along with labor.
If a novice like me can wing it and make it work, I think literally anyone else could do something cooler than this.
Just something I wanted to share.